For a more complete interpretation of this asana, please request your free copy of the Ananda Marga Asana Guide collected by AMAYE from moc.liamg@1agoyjm.
Primary Objective of the Ásana
A great wake up or warm up exercise as it activates the lower 5 chakras by stretching the arms, the back, the legs and the side. One of three vinyasas in the AM Yoga tradition.
Repetitions (standard): 4 rounds
Length of hold (ideal): 8 seconds Breath:exhale & inhale kumbhaka
| Steps of practice | Further details & rationale |
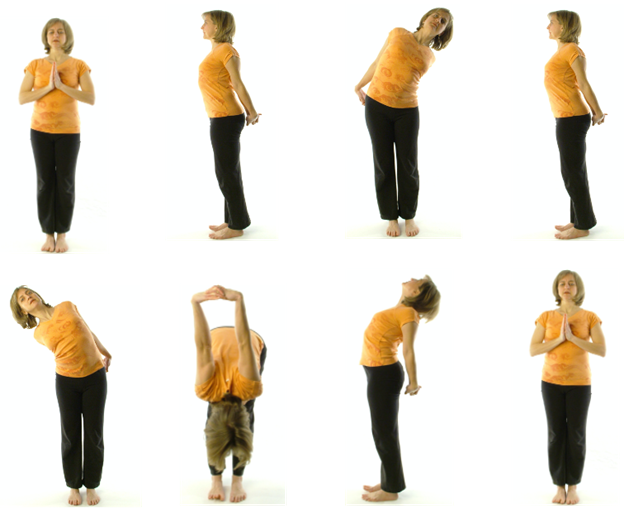
| STANDING PORTION | |
| 1. – Stand in Tadásana with the feet hip-width apart. You should feel well-grounded through the four corners of the feet. | – Depending upon the body type the feet may be more than hip-width apart for stability. – You can lift up the toes to engage the arches of the feet and to better ground the four corners of the feet. – The feet may or may not be parallel according to the anatomy of your hip. |
| 2. – Place both hands behind the back, interlocking the fingers and pressing the palms together. Roll the shoulders back and down, pulling the arms straight. – Gently squeeze the shoulder blades together. | – For some, the palms may be kept apart to create more openness and facilitate ease in the shoulders and arms. -This elicits a comfortable opening of the chest. |
| 3. – Inhale lengthening the spine. – Exhale. Keeping the hips stable, bend the upper body to the left and move the interlocked hands to the right at the same time. -As the torso moves to the left, the arms gently touch and stay close to the back. – Hold the exhale kumbhaka breath for 8 seconds. – Inhale and resume the original position. | – As in Padahastásana, make sure your head follows the torso to the side to create a smooth line extension through the entire spine. – – Keeping arms close to the back, stabilizes the upper torso. -The lower arms and wrists stretch out from the waist on the right side. |
| 4. – Exhale. Repeat the same process bending to the right side and come back up to the starting position on the inhale. | |
| 5. – Inhale. As you exhale, move the hips back, bending forwards from the hips, forward bending down towards the feet. -Bring the head as low as possible. -Gradually raise the interlocked hands behind you upwards. – Hold the kumbhaka exhale breath for 8 seconds. | – Forward bending is initiated by an anterior pelvic tilt to better maintain the natural curves of the spine. Moving the hips back facilitates the anterior pelvic tilt. -Keep the spine long. – For some people, bending their knees can also facilitate the anterior pelvic tilt by releasing the hamstrings. |
| 6. – Inhale, bend the knees, and hinging from the hips come back up to Tadásana with a straight back. – Exhale while standing and engage the abdominal muscles (Uddayana Bandha). | – In one’s personal practice one may move from the forward fold directly into the backbend in the same inhalation. This is how the posture is originally taught. -But in group teaching, it is advised to exhale in between these steps in order to prevent dizziness, loss of balance and to properly prepare the body for the backbend. |
| 7. – Inhale (keeping the hips stable), lengthen the front body and bend backwards, keeping the neck in alignment with the rest of the spine. – Hold the interlocked hands straight down, slightly touching the body. – Hold the inhale kumbhaka breath for 8 seconds. – Exhale as you slowly resume Tadásana. | – Engaging the core muscles (Uddayana Bandha) helps to stabilize the lower spine in the back bend. – Avoid pushing the hips forward while bending back to prevent undue pressure in the lower back. – Moving the arms slightly out from the body before bending back helps to open the chest and thoracic cavity for the backbend. -Slightly lift the shoulders to protect the neck strain on the first round may be helpful before slowly bringing the shoulder blades closer. – Imagining that you are breathing “into the kidneys” helps to lengthen and stabilize the lower back. – Keeping the eyes open in the backbend will help better assess balance if feeling dizzy. -Remember that even a slight backbend is acceptable. This is not Chakrásana. |
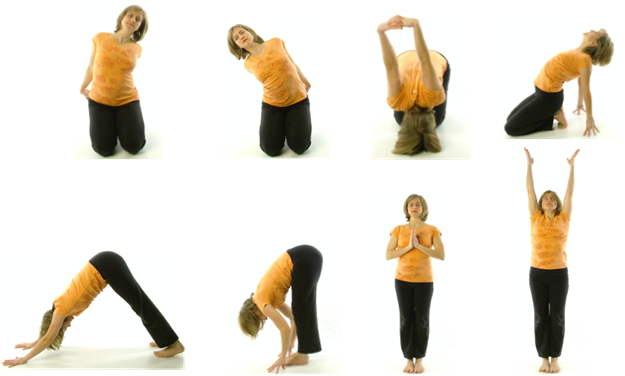
| KNEELING PORTION 1. -Transition: Inhale your arms upwards and then exhale them downwards towards the feet. – Assume a kneeling position on the ground, and sit back on the heels with the toes folded forwards, facing the knees. -Swim and direct the arms towards the back, interlacing the fingers once again. – On an exhale, bend to the left as done in the standing position, keeping the sitting bones grounded on the heels. -The hands and arms are going towards the right. – Apply the exhale kumbhaka for 8 seconds. – Inhale and resume an upright kneeling position. | -As in the Standing Part, the arms swing to the opposite side as the torso. |
| 2. – Exhale, repeat bending to the right. – Apply the exhale kumbhaka for 8 seconds. – Inhale and resume the upright kneeling position. | -The hands remain interlocked throughout. |
| 3. -Exhale and bend forward while trying not to lift the sitting bones off the heels. -Rest the forehead and nose on the floor, raising the interlocked hands upwards. – Hold the exhale breath kumbhaka for 8 seconds. – Inhale and slowly come back up to the original kneeling position.. | – To be safe in the forward bend, some may need to place their hands on the floor next to their ears first. -The hands can be kept on the floor for support during the pose if the sitting bones lift too much off the heels. – Avoid compressing the neck when the forehead is on the ground by lifting the shoulders away from the ears. – If the arms are brought too far forwards there is a possibility of compression in the cervical spine. |
Preparatory Steps
- Karmásana/Action pose can be used at the beginning of any ásana class as it exercises and warms up and energizes the whole body.
- Spend a few minutes loosening the joints of the body while standing.
- Standing forward bends stretch the hamstrings.
- The cat-cow sequence can help to loosen the spine and other joints.
- Arm circles, Vrksásana/Tree balance, and standing or seated Gomukhásana/Cow’s head for loosening shoulder muscles.
Considerations
Safety essentials
For the standing position
- If one has wrist problems, one can hold one wrist or forearm with the other hand or hold both elbows.
- A strap between the hands can be used, especially if the shoulders are tight.
- When bending forwards, initiate the movement from the hips and keep the neck in the same line as the spine. Only lower the head if one is deep in the forward bend.
- When bending back, the hips are kept relatively stable over the feet and the deep neck muscles are engaged to support the neck. You can also move the interlocked hands slightly away from the body and open the rib cage.
- When bending backwards in the standing or kneeling pose, one can place the hands on the waist or hips to give more support to the back.
- Avoid letting the head fall back in the backbend to prevent impingement in the cervical spine. Stabilize the neck by tucking in the chin (Jalandhara Bandha).
For the kneeling position
- If one has knee issues, one can put a cushion under the knees and/or between behind the knee (between lower thigh and calf).
- If you have knee issues – You can “stand on the knees” or do the “high kneel tadasana” (with the buttocks not touching the heels) during the sequence.
- If the ankles are a problem – You can flatten the feet on the mat if the toes are stiff.
- While backbending In the kneeling position – One can place the fingertips on the floor instead of the knuckles when doing the backbend or place the hand on waist or hips.
Benefits
- Energizes the entire body, nourishes the brain, and counteracts lethargy.
- Best asana for developing the body.
- Benefits hormonal secretion of adrenals, pancreas, stomach, intestine, and liver.
- Tones and stretches the spine, stretches and opens the lungs and thoracic cavity.
- Balances the hormone thiamin, located in the thymus gland behind the breast bone (sternum) which regulates our immune system.
- Contributes to good shoulder health and strengthening.
Visualizations & Ideations
- The free flow of life energy (prana) is moving throughout my body.
- I am feeling calm and in a state of harmony within the movements.
- I take positivity into the world with an open heart.